Configuring SSO Setup
NOTE: See the SmartSolve Installation Guide for instructions on how to configure the WebConfig file to enable the single sign-on feature.
- From the SmartSolve Portal Page, click the Home tab.
- In the Setup and Policy section, click Setup.
- In the User Management section, click SSO Setup.
Result: The Single Sign-On Setup window is displayed. - Click Action > Add.
Result: The Single Sign-On Setup entry window is displayed.
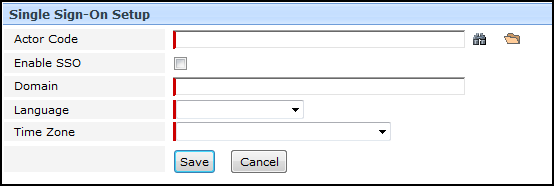
- Enter the information in the following fields:
| Field | Description |
|---|---|
|
Actor Code* |
Enter or zoom to select single or multiple actors for whom SSO is being enabled. |
| Enable SSO* |
Check this checkbox to enable SSO for the selected actor(s). |
|
Domain* |
Enter the user’s network domain. This activates the single sign-on option for the actor in SmartSolve©. |
|
Language* |
Select the language to be used when the actor logs into SmartSolve©. |
|
Time Zone* |
Select the Time Zone which the system will default to when this actor logs into SmartSolve©. |
- Click the Save button.
Result: Single sign-on has been enabled for all selected actors. The selected actors will now be automatically logged into SmartSolve© under the specified language and time zone next time they log into their domains.
See Also